
Proper installation helps a VoltPassThru cable gland or firewall grommet provide secure mechanical cable retention, protected panel entry, and a tight compression seal around the finished cable jacket. Before drilling, always confirm your cable outside diameter, required mounting-hole size, usable thread reach, and clearance on both sides of the panel.
Before You Drill — Confirm Your Size
Measure the finished cable outside diameter (O.D.), verify the required mounting-hole diameter, and confirm enough usable thread reach for the panel, sealing washers, locknut, and any rear-side accessory before drilling.
Automotive / Car Audio Sizing
For vehicle firewalls, amplifier power cables, battery relocations, and trailer chassis wiring organized around standard AWG battery conductors.
Solar / RV / Enclosure Sizing
For electrical enclosures, solar arrays, battery boxes, and RV/camper bulkheads organized primarily around measured Cable O.D.
Test-Fit Before Drilling
Before cutting the panel, test-fit the cable or loom through the assembled pass-through. Hand-tighten the compression cap until the internal seal grips the finished cable jacket snugly. If the fit is excessively tight or remains loose, stop and select a better-fitting size before drilling.
Before You Drill — Inspect Both Sides
Confirm that no wiring harnesses, hoses, fuel lines, brake lines, tanks, structural supports, HVAC components, mechanical linkages, or other obstructions are behind the intended mounting location. Wear appropriate eye protection and use a cutting tool suited to the panel material.
For automotive and firewall installations, carefully verify clearance around the heater core / HVAC case, brake booster, steering column, pedal mechanisms, hidden factory wiring, and fuel / brake lines before marking or cutting.
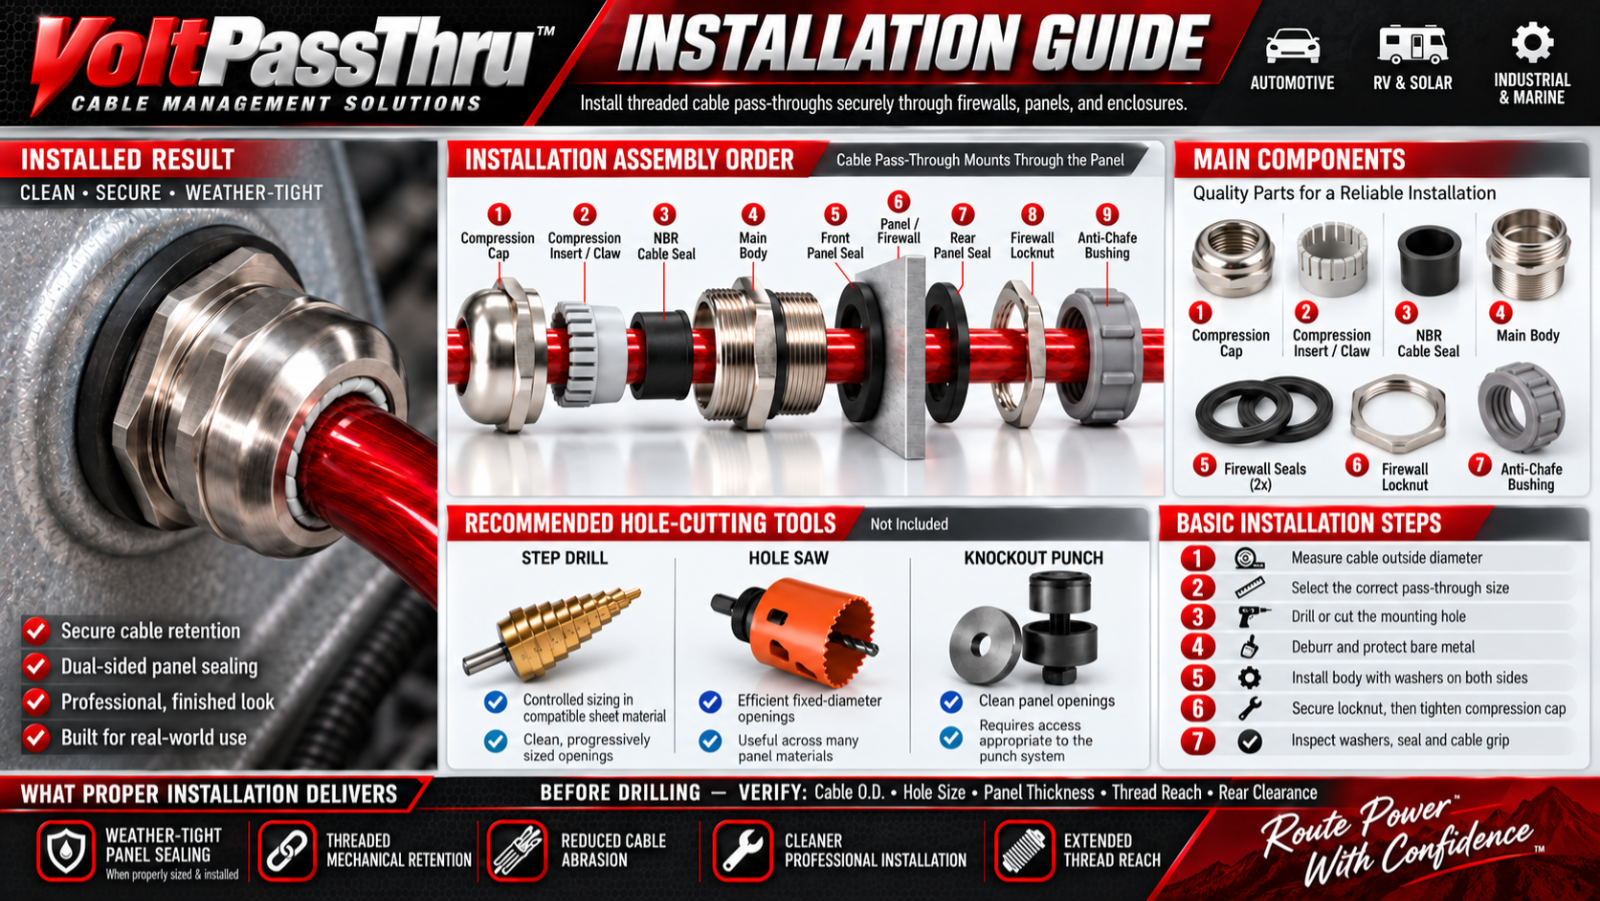
Know the Parts Before Installation
Understanding how the components assemble ensures proper panel sealing and mechanical retention:
Compression Cap
Tightens onto the body to compress the internal seal and activate radial cable grip.
Divided Compression Claw
Applies balanced, circular mechanical retention around the cable jacket as the cap is torqued.
Internal Compression Seal
Forms the primary seal around the finished cable jacket or closed wire loom.
Main Pass-Through Body
Threaded barrel that passes through the panel opening, with integrated wrench flats.
Front NBR Panel Washer
Seats between the pass-through body shoulder and the exterior/front panel surface.
Rear NBR Panel Washer
Seats between the interior/rear panel surface and the mounting locknut.
Mounting Locknut
Threads onto the barrel from behind the panel to clamp the assembly securely in place.
Threaded Anti-Chafe Exit Bushing
On applicable metal kits where equipped, threads onto the rear barrel to provide a rounded exit surface away from sharp metal edges.
Tools Recommended for Installation
Gather these recommended tools to ensure a clean, precise, and damage-free installation:
Digital or Dial Calipers
Verify finished cable O.D. over jacket or loom before selecting hardware or drilling.
Center Punch
Locates the center of the opening and prevents drill bit walk on metal or composite panels.
Pilot Drill
Creates a small 1/8″ guide hole to accurately steer the larger hole saw or step bit.
Hole Saw / Step Drill
Cut to the exact mounting-hole diameter specified for your VoltPassThru model and material.
Deburring Tool / File
Removes sharp cut edges, burrs, and metal filings from both sides of the panel.
Appropriate Wrenches
Fitted open-ended wrenches for the body hex flats and rear locknut (avoid slip-joint pliers).
Primer / Protective Coating
Protects freshly exposed bare steel edges after drilling to prevent rust and corrosion.
Eye Protection
Required safety eyewear when drilling, cutting, and deburring vehicle or enclosure panels.
Step-by-Step Cable Gland & Firewall Grommet Installation
Follow this verified ten-step procedure for a secure, weather-tight, and professionally retained cable installation:
Measure & Test-Fit the Cable
Measure the finished cable outside diameter using calipers. If loom or sleeving will pass through and be compressed by the pass-through, measure the completed cable-and-covering assembly. Before drilling, test-fit the cable through the assembled pass-through and hand-tighten the compression cap. Confirm the cable falls within the verified compression range.
Choose the Location & Inspect Both Sides
Choose a flat mounting location with adequate access to the front and rear of the panel. Confirm clearance for mounting nut, sealing washer, wrench/tool access, cable bend radius, and rear anti-chafe bushing where equipped. For vehicle installations, inspect carefully for hidden wiring, brake/fuel lines, HVAC components, pedal mechanisms, and structural components.
Mark and Drill the Opening
Mark the mounting-hole center and use an appropriate center punch and pilot hole where suitable. Cut the opening to the mounting-hole diameter specified for the selected VoltPassThru model using a cutting tool appropriate for the panel material. See the Auto Sizing Guide or Solar & RV Sizing Guide for the required mounting-hole diameter.
Deburr and Protect the Panel
Remove sharp burrs and filings from both sides of the opening with a deburring tool or round file. For bare steel surfaces, apply an appropriate primer or protective coating to exposed cut metal to help prevent corrosion. Make sure the washer sealing surfaces are clean, smooth, and free of debris.
Install the Front NBR Washer
Remove the rear mounting hardware as needed. Slide one wide NBR washer onto the threaded body so it will sit between the front side of the panel and the pass-through body shoulder. The washer should sit flat and centered against the panel.
Insert the Pass-Through into the Panel
Route the threaded body through the mounting opening. Confirm the front washer remains flat and centered around the opening. Avoid pinching, folding, twisting, or partially extruding the washer.
Install the Rear Washer & Locknut
Place the second NBR washer over the threaded barrel from the rear side of the panel. The mounting panel should now be sandwiched between the front and rear sealing washers. Thread the mounting locknut onto the body. Hand-tighten first, then snug using appropriate wrench flats/tooling. Do not overtighten to the point that the panel, threads, or washer seals are damaged or distorted.
Route the Cable & Tighten the Compression Cap
Pass the cable through the pass-through and position it at the required installed length. Support heavy cable independently so the pass-through is not carrying unnecessary cable weight. Hand-tighten the compression cap until the internal compression system grips the cable jacket firmly and evenly. Do not crush, excessively deform, or damage the cable insulation.
Install the Anti-Chafe Exit Bushing — If Equipped
This step applies only to compatible metal kits that include the threaded rear anti-chafe bushing. Thread the bushing onto the available rear barrel after the pass-through has been secured. Its rounded cable-exit surface is intended to help keep the cable jacket away from the metal panel edge at the rear of the installation. (This accessory is not required for nylon products or metal kits that do not include it).
Perform a Final Inspection
Verify that front and rear washers are seated evenly, mounting hardware is secure, cable jacket is gripped evenly, cable is not pinched, no sharp edges contact the cable, cable bend radius is reasonable, heavy cable has external support where needed, usable thread engagement remains adequate, and the anti-chafe accessory is secure where equipped. For weather-exposed installations, visually confirm sealing surfaces are properly seated.
Installation Notes by Application
While the mechanical assembly remains identical, specific mounting environments require tailored precautions:
Automotive / Firewall / Trailer Chassis
- Inspect both sides of the firewall, floor pan, or frame bracket before center-punching or drilling.
- Check clearance around brake lines, fuel hardlines, HVAC boxes, steering columns, and pedal linkages.
- Deburr and apply protective primer to freshly cut bare steel to stop rust before it starts.
- Maintain a generous cable bend radius leading into the grommet; avoid sharp 90-degree bends at the fitting.
- Use independent insulated cable clamps along the frame rail or firewall to carry heavy battery cable weight.
- If split wire loom or braided sleeving enters the gland, measure the complete assembly O.D. over the covering.
- Verify adequate rear wrench and locknut clearance, including room for the rear anti-chafe bushing where equipped.
Solar / RV / Battery / Electrical Enclosures
- Measure actual finished cable outside diameter with calipers rather than relying on wire gauge markings.
- Verify electrical enclosure or bulkhead wall thickness against the fitting’s verified usable thread reach.
- Confirm sufficient thread engagement for panel thickness, dual NBR washers, and full locknut purchase.
- Ensure sealing washers sit completely flat against smooth enclosure knockouts or drilled openings.
- Independently anchor heavy inverter DC cables or battery interconnects so the gland does not support cable weight.
- Avoid excessive side-loading or tension immediately adjacent to the fitting.
- Verify internal component clearance inside electrical cabinets, combiner boxes, and battery compartments.
Installation Tips
Professional practices for high-reliability, weather-tight installations:
Protect Bare Steel
On steel panels, protect freshly cut exposed metal with an appropriate primer or coating after deburring.
Multiple Wires or Wire Loom
When routing multiple conductors through one pass-through, small voids may remain between the individual wires. Where appropriate for the installation, a small amount of compatible sealant may be used around the conductors before final tightening to help fill small gaps and improve weather resistance.
Seal Configuration
Product configurations may include different washer/seal arrangements. For installations using the wide NBR panel washers, position one washer against each side of the mounting surface unless the specific product configuration requires otherwise.
Cable Support
Do not rely on the pass-through as the sole structural support for heavy battery, inverter, winch, or hydraulic pump cable. Secure the cable with suitable clamps or supports near the installation.
Avoid Excessive Side Load
Allow the cable to exit naturally without forcing a severe bend immediately against the fitting.
Weather-Tight Sealing
When correctly sized and properly installed, the compression system is designed to create a dust-tight, air-tight, and weather-tight cable entry.
Frequently Asked Installation Questions
Yes. AWG describes conductor size, not finished cable outside diameter. Insulation thickness varies substantially between manufacturers, voltage ratings, and cable constructions (e.g. welding cable vs marine wire vs standard battery cable).
If the covering will pass through and be compressed by the pass-through, measure the complete assembly with the loom fully closed. If the covering stops before the fitting, measure only the cable jacket.
Use the mounting-hole diameter specified for the exact VoltPassThru model. Consult our Auto Sizing Guide or Solar & RV Sizing Guide for exact model dimensions before drilling.
Yes. Always remove sharp burrs, rough edges, and filings from both sides of the panel before mounting hardware so the sealing washers seat completely flush and flat against the panel.
The pass-through provides cable grip and protected panel entry, but heavy cable should also be supported with suitable cable clamps or structural supports near the installation to prevent vibration strain.
Suitability depends on panel thickness, mounting-hole quality, available usable thread reach, sealing surface condition, and the requirements of the installation. Verify the specific application and mounting thickness before drilling.
The front and rear NBR washers sandwich the mounting surface and help provide stable, sealed panel contact when correctly installed against a smooth, clean surface.
It is the threaded anti-chafe exit bushing supplied with applicable metal kits. It threads onto the rear of the barrel behind the panel to provide a rounded cable-exit surface that helps keep the cable jacket away from sharp metal panel edges.
Ready to Install? Start With the Correct Size.
Measure the finished Cable O.D. first, then verify mounting-hole size, usable thread reach, panel thickness, and rear clearance before drilling.


