
Route battery, winch, hydraulic pump, brake, charging, and auxiliary wiring cleanly through trailer tongue boxes, equipment compartments, frames, body panels, and electrical enclosures. VoltPassThru threaded cable glands and pass-through grommets provide mechanical cable retention and protected panel entry for demanding trailer electrical installations.
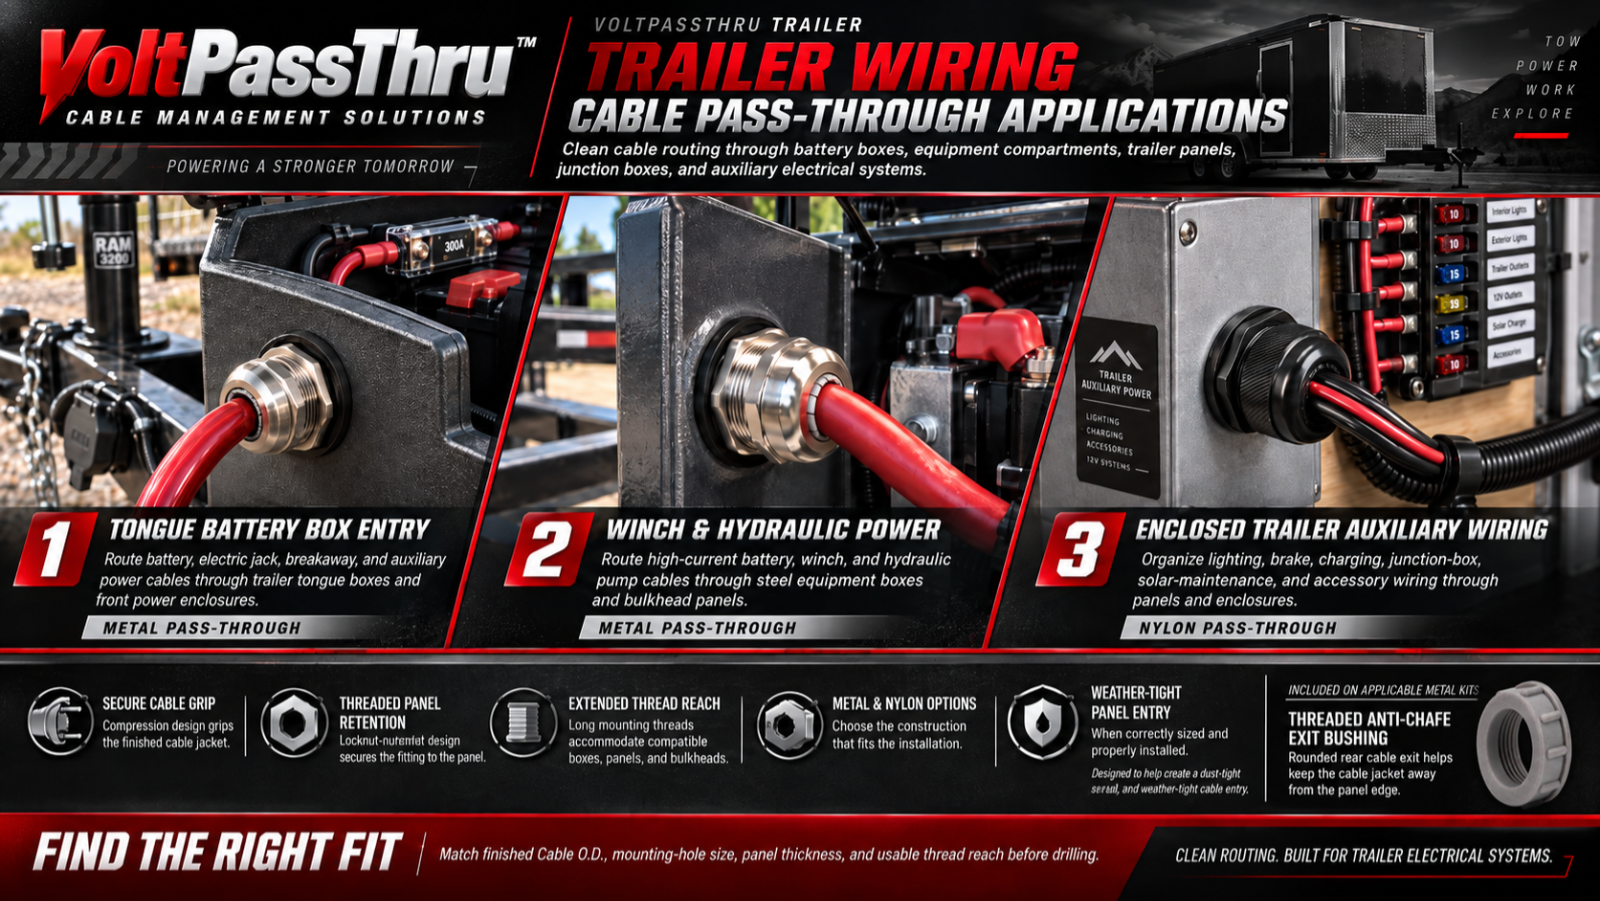
Common Trailer Cable Pass-Through Locations
Trailers combine high-current DC power cables, auxiliary battery lines, and exterior control wiring across varied mounting surfaces. Select an installation location to understand hardware requirements:
Trailer Tongue Battery Box Wiring
Battery positive and negative feeds, breakaway battery leads, and electric jack wiring routing through metal or plastic battery enclosures.
Dump Trailer Hydraulic Pump Wiring
High-amperage 2 and 4 AWG DC battery cables routing into hydraulic power units, pump compartments, and steel tongue equipment boxes.
Trailer Winch Power Cable
Heavy 1/0 or 2/0 AWG DC power cables for front tongue-mounted or rear equipment winches routing through frame bulkheads and equipment enclosures.
Enclosed Trailer Wiring
Auxiliary 12V lighting, interior power feeds, and accessory circuits routed through steel or aluminum sidewalls, partitions, and floor panels.
Brake, Breakaway & Junction Box Wiring
Electric brake feeds, emergency breakaway wiring, and 7-way auxiliary harnesses entering exterior junction boxes and structural frames.
Trailer Solar & Auxiliary Battery Wiring
Trailer-mounted solar panels, onboard battery chargers, inverter cabinets, and auxiliary charging systems on work trailers or overland rigs.
Why Trailer Wiring Benefits from a Threaded Pass-Through
Trailer wiring frequently passes through thin sheet metal, tubular framing, battery boxes, equipment compartments, and exposed body panels. A raw drilled hole or loose push-in grommet may leave the cable dependent on friction alone. VoltPassThru uses a threaded body and locknut to mechanically retain the fitting to the panel, while the compression system grips the finished cable jacket. Properly installed panel seals help create a dust-tight, air-tight, and weather-tight cable entry.
How to Choose the Correct Size for Trailer Wiring
Trailer wiring installations range from small brake lines to heavy winch power cables. Follow this five-step process to ensure a secure, weather-tight fit:
Identify the Cable & Routing Location
Determine whether the wiring is battery, winch, hydraulic pump, brake/control, auxiliary power, or solar cable, and identify the mounting surface: steel panel, aluminum body, plastic battery box, composite wall, trailer floor, tubular frame, or equipment enclosure.
Measure the Finished Cable O.D.
Do not choose solely by AWG or conductor size. Use digital or dial calipers to measure the complete outside diameter of the finished cable jacket. If wire loom, braided sleeving, or heat-shrink will pass through the gland, measure the complete assembly.
Match the Verified Cable O.D. Range
Compare your measured diameter to VoltPassThru hardware ranges: metal ranges are 3–6.5 mm, 5–10 mm, 6–12 mm, and 10–18 mm; nylon ranges are 3–8 mm, 5–10 mm, 8–12 mm, and 11.5–18 mm. Sizing by finished O.D. ensures the internal compression claw creates a secure radial grip and weather seal.
Verify Panel Thickness & Thread Reach
Confirm that the mounting surface thickness falls within the fitting’s usable thread reach, allowing full engagement for sealing washers, locknut, and rear clearance. Extended-thread metal models provide extra reach for thick steel tongue brackets and multi-layer barriers.
Verify the Required Mounting Hole
Check the required hole saw or step bit cutout size before drilling (e.g. 1/2″, 3/4″, 7/8″, or 1-1/8″). Always deburr both sides of drilled metal holes before mounting hardware.
Which Sizing Guide Should I Use?
Both guides ultimately require verification of finished Cable O.D., but offer tailored starting points based on how your wiring is specified:
Auto Sizing Guide — Battery / Winch / Pump
Best starting point when the installation is described primarily by automotive-style wire gauge (1/0, 2, 4, 6, or 8 AWG) for heavy battery cables, winch power leads, and hydraulic dump pumps.
Solar Sizing Guide — Enclosures / Solar / Battery
Best starting point when the installation is organized primarily by actual measured Cable O.D. for battery boxes, inverter compartments, solar equipment, electrical enclosures, and multi-conductor DC wiring.
Recommended Pass-Through Hardware for Trailer Wiring
Select from verified VoltPassThru models based on equipment type and measured cable diameter:
Heavy Battery / Winch / Hydraulic Cable
Typical applications include battery-to-pump cables, high-amperage winch power leads, and primary DC distribution lines. Larger VoltPassThru sizes support compatible heavy DC cable when the measured jacket diameter falls within the verified Cable O.D. range.
Mid-Size Auxiliary Power
Typical applications include electric tongue jacks, smaller utility winches, accessory feeds, trailer battery charging circuits, and DC-to-DC feeds. Mid-size hardware accommodates power wiring within verified 5–10 mm or 6–12 mm O.D. ranges.
Brake / Control / Auxiliary Wiring
Typical applications include electric brake wiring, emergency breakaway cables, 7-way auxiliary feeds, exterior lighting circuits, and sensor lines. Compact models securely clamp smaller single- or multi-conductor cables from 3 to 6.5mm O.D.
Solar & Battery Enclosures
Typical applications include rooftop solar entry, auxiliary battery boxes, inverter compartments, onboard charger wiring, and electrical cabinets. Sized for plastic or composite enclosures across verified O.D. ranges.
Choosing Metal or Nylon for Trailer Wiring
Both material options provide threaded panel retention and compression cable grip. Choose the construction that best matches your mounting material and structural demands:
Polyamide Nylon Pass-Throughs
- Polyamide nylon construction
- Lightweight and non-conductive
- Threaded panel retention
- Useful for compatible plastic boxes, interior trailer panels, junction boxes, and lighter auxiliary wiring
Trailer Wiring Installation Considerations
Trailers encounter vibration, road spray, dirt, moisture, and changing weather conditions. Follow these practical installation practices for long-lasting reliability:
Check Both Sides Before Drilling
Always inspect behind the mounting surface before drilling. Verify complete clearance from structural members, brake lines, hydraulic hoses, existing wire harnesses, hinges, suspension travel, and moving components.
Deburr Metal Edges
Drilling through steel or aluminum trailer frames leaves sharp metal burrs. Deburr both sides of the hole completely with a deburring tool or file so panel sealing washers seat flush and flat against the panel.
Protect Exposed Metal
Where drilling cuts through paint, powder coat, or galvanizing, apply an appropriate primer or corrosion-inhibiting coating compatible with the trailer metal before installing the pass-through hardware.
Verify Rear Clearance
Allow adequate interior space behind the mounting surface for the locknut, washer, rear anti-chafe bushing (where used), wrench access, and a gradual cable exit path without sharp obstructions.
Support the Cable Near the Fitting
Heavy battery and winch cables should not hang unsupported from the gland. Anchor wiring securely to the trailer tongue or frame rail with insulated clamps close to the pass-through to minimize vibration strain.
Avoid Tight Bends & Weather Sealing
Maintain an appropriate cable bend radius before and after the pass-through. When correctly sized and properly installed against a suitable mounting surface, the compression and panel-sealing system is designed to create a dust-tight, air-tight, and weather-tight cable entry.
For complete hole preparation, washer seating, and locknut torque procedures, see our VoltPassThru Installation Guide.
Frequently Asked Trailer Wiring Questions
Large winch and hydraulic-pump cables are commonly described by AWG (typically 2, 4, or 1/0 AWG), so the Auto Sizing Guide is usually the easiest starting point. Always verify finished Cable O.D. over the insulation jacket or wire loom before selecting the pass-through.
Measure the finished outside diameter of the cable entering the box with calipers, then compare it with the verified Cable O.D. range in the chart. Also verify required mounting-hole size, box wall thickness, usable thread reach, and rear clearance for the locknut.
Yes, when the battery or pump cable diameter, panel thickness, mounting-hole requirement, and installation environment match the selected hardware. Heavy pump cables should be mechanically supported with an insulated clamp near the pass-through.
VoltPassThru hardware may be used with compatible mounting materials when panel thickness, hole size, surface condition, usable thread reach, and installation requirements are appropriate. Deburr metal holes and verify that the mounting surface provides adequate support.
Yes, compatible hardware can be used for trailer solar, battery, charging, and electrical-enclosure cable entry. Select by actual Cable O.D. and use the Solar Sizing Guide for enclosure- and battery-oriented applications.
Find the Right Pass-Through for Your Trailer Wiring
Start with the equipment being wired, then verify finished Cable O.D., mounting-hole size, panel thickness, and usable thread reach.


